Vegetable Garden Layout Plans and Spacing: Complete Guide + Free Plans to Copy
Spacing is the variable that separates a productive vegetable garden from an overcrowded or underused one. This guide covers the three main layout systems, a full spacing reference for 22 common vegetables, and five ready-made garden bed plans you can copy directly into your EdenVatika account.
Most vegetable gardens underperform not because of bad soil or bad luck — but because of bad spacing and poor placement.
Plants placed too close compete for light, water, and nutrients. Plants placed too far apart waste valuable growing space and invite weeds.
But spacing is only part of the equation — where each crop sits in the garden, and how its bed is arranged, shapes the entire season's outcome.
This guide combines the core principles of layout design, a spacing reference for common vegetables, a practical 10-step placement system, and five ready-made garden bed plans you can copy directly into your EdenVatika account and customise from there.
Why Layout Planning Matters More Than Most People Think
When you plan a layout before planting, you are making decisions while they are still reversible. You catch the spacing mistake before the plants are in the ground.
You notice that the tall sweetcorn will shade the low-growing courgette behind it. You realise you have planned five brassicas in beds that grew brassicas last year.
A plan does not need to be perfect. It needs to be done before you buy seeds.
The planning stage is also when companion planting actually gets applied — not as an afterthought mid-season, but as a structural part of the bed design.
Tomatoes next to basil. Leeks near carrots. Calendula and nasturtiums scattered throughout to attract pollinators and deter pests. These decisions are easy to make on paper and nearly impossible to act on once beds are full.

Start With Sunlight — Not Your Plant List
The most common planning mistake is starting with a wishlist of plants and trying to fit them into whatever space is available. Start with your space instead — and specifically with sunlight.
Walk your garden at three points in the day — morning, midday, and late afternoon — and note where shadows fall. This takes twenty minutes and will inform every planting decision you make.
Sunlight thresholds to work from:
- 8+ hours direct sun: Tomatoes, peppers, aubergine, cucumbers, courgette, squash, sweetcorn — your most productive crops need this minimum to perform properly
- 5–6 hours direct sun: Staple crops — potatoes, onions, garlic, leeks, most root vegetables. These tolerate some shade but yield best in good light
- 2–3 hours direct sun: Shade-tolerant crops — lettuce, spinach, salad leaves, radishes, beetroot, parsley, coriander. In warmer climates, afternoon shade actively helps these crops avoid bolting
Map your sun zones onto your beds before you place a single crop. This one constraint shapes the entire layout. Do not put tomatoes in a spot that gets five hours because it is convenient — give them your best position, always.
Also check for frost pockets — low-lying areas where cold air settles. These spots experience the last frosts of spring and first frosts of autumn. Keep tender crops away from them, or use them only for cold-hardy plants like kale, leeks, and garlic.
The Three Main Layout Systems
1. Traditional Row Planting
Row planting runs crops in parallel lines with defined pathways between rows. It works well for large plots, single-crop growing, and anything that needs access alongside it — staking tomatoes, earthing up potatoes, or running drip irrigation.
For small home gardens, row planting is often inefficient. Pathways take up a large proportion of the growing space, and each row typically holds only one type of plant. It is easy to manage but slow to maximise.
Row spacing rules of thumb:
- Small plants (lettuce, radish, beetroot): 20–30 cm between rows
- Medium plants (carrots, onions, beans): 30–45 cm between rows
- Large plants (tomatoes, peppers, squash): 60–90 cm between rows
- Very large plants (sweetcorn, pumpkins): 90–120 cm between rows
Some crops genuinely belong in rows: potatoes (which need to be earthed up), tomatoes (which need staking access from both sides), peas and pole beans (which grow along a central support). For everything else, consider block growing.
2. Block Growing in Raised Beds
Block growing abandons single-file rows in favour of planting across the full width of the bed in a grid or offset pattern. The result is higher plant density, better soil coverage (which suppresses weeds), and significantly more yield per square metre.
One important point: seed packet spacing is often conservative, written for traditional row gardens with path compaction and sub-optimal soil.
In a well-prepared raised bed — loose, fertile, well-draining — you can typically reduce packet spacing by 20–30% and still get full-sized crops. A plant listed at 45 cm spacing will often do well at 35 cm in a properly built raised bed.
Block growing also enables a useful technique: sow thickly and thin as you harvest. Direct-sow carrots, beetroot, or salad leaves more densely than the final spacing, then thin progressively as seedlings develop — eating the thinnings as baby vegetables along the way. You get two harvests from the same space: thinnings early, full-sized crops later.
One practical rule for raised beds: minimise pathways inside the growing area. Design beds so every part can be reached from the edge.
Use dead-end paths rather than through-routes where possible. Every square foot of path is a square foot of growing space you have surrendered.
3. Square Foot Gardening
Square foot gardening divides the bed into 30 cm × 30 cm squares and assigns a fixed number of plants per square based on mature size.
It is a clean, easy-to-visualise system that works particularly well for mixed-crop raised beds, especially for beginners who want a clear framework.
The key insight is thinking in plants per square rather than spacing in centimetres. Large plants get multiple squares. Small plants share a square with several others. This prevents under-planting the edges and over-planting the centre — both common mistakes in mixed beds.
Use the free plant spacing calculator
EdenVatika's plant spacing calculator shows exactly how many plants fit in any bed size — and compares row, square foot, and intensive spacing side by side.
Try Plant Spacing Calculator →Spacing Reference: 22 Common Vegetables
These figures apply to raised beds and intensively managed in-ground beds. For traditional row gardens, increase row-to-row spacing by 25–50%.
| Vegetable | Plant Spacing | Plants / sq ft | Notes |
|---|---|---|---|
| Tomato (indeterminate) | 60–90 cm | 1 per 4–6 sq ft | Stake or cage; keep in rows for staking access |
| Tomato (determinate / bush) | 45–60 cm | 1 per 2–4 sq ft | More compact; suits raised beds and containers |
| Courgette / Summer Squash | 60–90 cm | 1 per 4–6 sq ft | Sprawls widely; plan for this or use compact varieties |
| Cucumber (trellis) | 30–45 cm | 1–2 per sq ft | Train vertically; uses a fraction of horizontal space |
| Pepper (sweet or chilli) | 35–45 cm | 1 per sq ft | Needs shelter; fussy crop — give it the best spot |
| Aubergine / Eggplant | 45–60 cm | 1 per 2 sq ft | Needs heat; sunniest, most sheltered position |
| Cabbage | 45–60 cm | 1 per 2 sq ft | Mini varieties can go closer; full-size needs room |
| Broccoli | 45–60 cm | 1 per 2 sq ft | Side-shoots follow main head; do not uproot early |
| Kale | 40–50 cm | 1 per 2 sq ft | Pick outer leaves to extend season into winter |
| Lettuce (head types) | 25–30 cm | 4 per sq ft | Cut-and-come-again varieties can go at 15 cm |
| Spinach | 10–15 cm | 9 per sq ft | Sow thickly; thin and eat the thinnings |
| Radish | 5–8 cm | 16 per sq ft | Sow between slow-maturing carrots; ready in 3–4 weeks |
| Beetroot | 10 cm | 9 per sq ft | Each seed cluster needs thinning; thin to eat as greens |
| Carrot | 5–8 cm | 16 per sq ft | Sow densely; thin for baby carrots while loosening soil |
| Onion / Shallot | 10 cm | 9 per sq ft | Suits block growing; easy to plant uniformly |
| Leek | 15 cm | 9 per sq ft | Plant deep into holes; do not backfill |
| Garlic | 10–15 cm | 9 per sq ft | Plant cloves in autumn; suits block growing well |
| French Bean (bush) | 10–15 cm | 9 per sq ft | Direct sow after last frost; block-sow for high density |
| Climbing Bean (runner / pole) | 15–20 cm | 4–6 per sq ft | Needs strong vertical support; grows 2–3 m |
| Sweetcorn | 30–35 cm | 1 per sq ft | Wind-pollinated; must be planted in blocks, not single rows |
| Basil | 20–25 cm | 4 per sq ft | Plant near tomatoes; pinch flowers continuously |
| Swiss Chard | 20–25 cm | 4 per sq ft | Harvest outer leaves; productive from spring to hard frost |
Bed Width and Path Design
Bed width determines whether you can maintain a bed without stepping into it. Step into a raised bed even once and you compact the soil, defeating much of the reason you built it.
The standard maximum is 4 feet (120 cm) — the distance most people can comfortably reach to the centre from either side. If a bed is accessible from one side only (against a fence or wall), the maximum workable width drops to about 60 cm.
For pathways, the minimum comfortable kneeling width is 45 cm. A 60 cm path allows wheelbarrow access. Choose based on how you garden — if you kneel to weed, 45 cm is fine; if you use a barrow, 60 cm saves frustration over the season.
A practical and low-cost path surface: lay cardboard directly on the ground (suppresses weeds), then cover with woodchip.
The cardboard breaks down over a season, the woodchip decomposes slowly into the soil below, and the whole path effectively becomes a slow-release soil improver for the beds alongside it.
The Height Rule: Plan Beds North to South
Place your tallest crops at the northern end of each bed so their shadow falls away from the rest of the planting (reverse this in the southern hemisphere — tallest to the south). The practical order for most summer beds:
- Back (north): Climbing beans, sweetcorn, indeterminate tomatoes on stakes, trellised cucumbers, Malabar spinach on a frame
- Middle: Peppers, aubergine, determinate tomatoes, broccoli, cabbage, courgette
- Front (south): Lettuce, spinach, herbs, radishes, beetroot, carrots, onions
Some deliberate shading is useful: fast-growing climbing beans or trellised cucumbers can create afternoon shade that protects lettuce from bolting in midsummer. Layer shade-tolerant greens directly beneath vertical structures to use that space rather than leaving it unplanted.
Sample Garden Bed Plans — Copy Directly to Your Account
The following beds were designed with EdenVatika's garden planner. Each is a complete, ready-to-use layout with plants placed according to proper spacing, companion rules, and seasonal timing.
Any logged-in EdenVatika user can view a shared bed and copy it directly to their own account — then customise it for their zone, bed size, or preferred varieties. Free users can view and copy shared plans. You do not need a Pro subscription to copy someone else's layout.
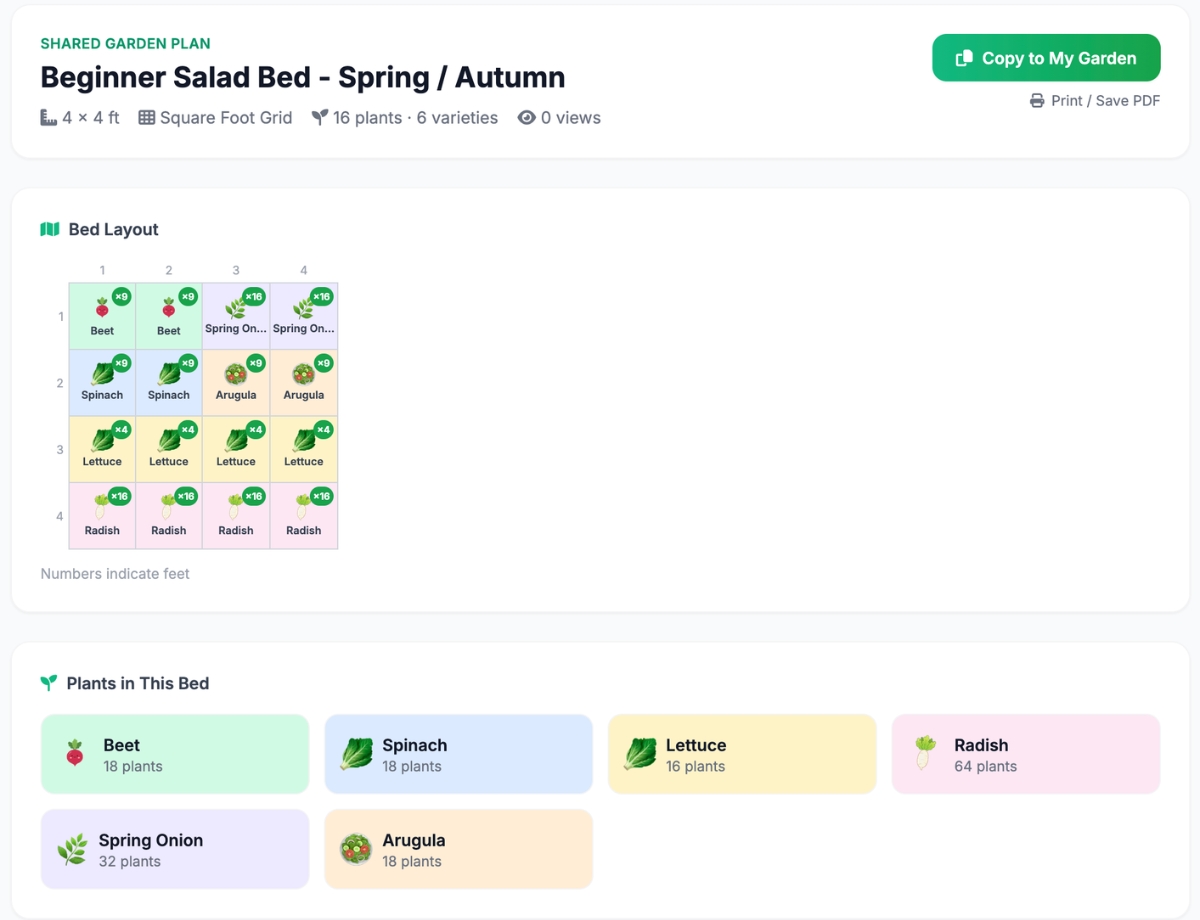
Plan 1 — 4×4 ft Beginner Salad Bed
A compact, highly productive bed for cut-and-come-again salad crops. Designed for small spaces, patios, or a first raised bed. All plants are direct-sown or transplanted as plugs, mature quickly, and produce continuously when harvested correctly. Sited in a partially shaded position — this bed actively benefits from afternoon shade in warmer months.
What's in it: Loose-leaf lettuce (mixed varieties), spinach, rocket (arugula), radish, spring onion, beetroot
Bed size: 4 ft × 4 ft (120 × 120 cm) | Season: Spring / Autumn
This plan is shared on EdenVatika. Log in to view the full layout and copy it to your garden.
View & Copy This Plan → Free account requiredPlan 2 — 4×8 ft Summer Tomato & Companion Bed
A summer staple bed built around indeterminate tomatoes staked at the north end, with a full companion planting scheme filling the remaining space. Basil, peppers, and marigolds share the bed in a layout designed to maximise airflow and pest deterrence. Requires the sunniest spot in the garden — 8+ hours direct sun.
What's in it: 2× indeterminate tomato, 3× sweet pepper, 6× basil, 1× aubergine, 4× French marigold along the front edge
Bed size: 4 ft × 8 ft (120 × 240 cm) | Season: Late spring to early autumn
This plan is shared on EdenVatika. Log in to view the full layout and copy it to your garden.
View & Copy This Plan → Free account requiredPlan 3 — 4×8 ft Spring Brassica & Allium Bed
A structured spring bed for brassica crops with allium companions placed to deter cabbage white butterfly and onion fly. Designed so that early-finishing crops clear space for late-spring gap-fillers, maximising productivity across the season. The alliums also benefit from 5+ hours sun — give this bed a reliable position.
What's in it: 2× broccoli, 2× cabbage, 2× kale, 9× leek (back row), 9× onion sets (centre), 9× garlic (front edge), calendula at corners
Bed size: 4 ft × 8 ft (120 × 240 cm) | Season: Early spring to midsummer
This plan is shared on EdenVatika. Log in to view the full layout and copy it to your garden.
View & Copy This Plan → Free account requiredPlan 4 — 4×4 ft Three Sisters Bed
The traditional Three Sisters planting — sweetcorn, climbing beans, and squash — adapted for a raised bed. The corn provides a living trellis for the beans; the beans fix nitrogen; the squash shades the soil, retaining moisture and suppressing weeds.
A self-supporting ecosystem in a single bed. Needs full sun and a sheltered position — sweetcorn is wind-pollinated so must be planted in a block, not a line.
What's in it: 4× sweetcorn (central block), 8× climbing bean (around each stalk), 1× compact winter squash (perimeter)
Bed size: 4 ft × 4 ft (120 × 120 cm) | Season: Early summer to first frost
This plan is shared on EdenVatika. Log in to view the full layout and copy it to your garden.
View & Copy This Plan → Free account requiredPlan 5 — 3×6 ft Cut-and-Come-Again Herb & Greens Bed
A continuous-harvest bed designed to sit close to the kitchen door — exactly where it belongs. Herbs and frequent-harvest crops placed at the front edge for easiest daily access.
Cut-and-come-again crops are replaced in waves as they exhaust. Nasturtiums at the perimeter add edible flowers and attract aphids away from the beans nearby.
What's in it: 3× basil, 2× flat-leaf parsley, 1× coriander, 1× dill, 4× loose-leaf lettuce (mixed), 2× Swiss chard, nasturtium along one edge
Bed size: 3 ft × 6 ft (90 × 180 cm) | Season: Spring through autumn
This plan is shared on EdenVatika. Log in to view the full layout and copy it to your garden.
View & Copy This Plan → Free account requiredSuccession Planting: The Habit That Eliminates Feast-or-Famine Harvests
Succession planting means sowing the same crop in small batches every two to four weeks rather than all at once. Without it, a full bed of lettuce produces more than you can eat for two weeks, then bolts simultaneously and produces nothing for the rest of the season.
The crops that benefit most, with suggested intervals:
- Lettuce — every 2–3 weeks, spring and autumn
- Radish — every 10–14 days throughout the season (use as gap fillers between slower crops)
- Spinach — every 3 weeks, avoiding the midsummer heat window
- Coriander — every 3 weeks (bolts extremely fast; succession is non-negotiable)
- French beans — every 3 weeks from last frost to midsummer
- Beetroot — every 4 weeks, spring through late summer
The practical move: when laying out a bed, designate a small strip or corner specifically for successive sowings. A 30 cm strip of radish sown every two weeks is not dead space — it is a scheduling tool that keeps the bed productive and suppresses weeds in the gap between larger crops.
Vertical Growing: The Simplest Way to Double Productive Space
Most vegetable gardens are planned in two dimensions. Trellises, arches, and A-frames add a third — and the return on space is significant.
Cucumbers trained vertically take a third of the bed footprint of the same plant sprawling horizontally. Climbing beans produce from the same 30 cm strip for the entire season.
Malabar spinach, achocha, vining peas, and even butternut squash (with sling support for the fruit) all work well on vertical structures.
Place all vertical structures at the north end of the bed only. This ensures the trellis casts its shadow behind the bed, not across it. Then layer shade-tolerant crops
— lettuce, spinach, salad leaves — directly beneath the structure to use that shaded ground rather than leaving it bare.
Crop Rotation: Why Your Layout Changes Every Year
Crop rotation means not growing the same plant family in the same soil two years running. It slows soil-borne disease and breaks the lifecycle of pests that overwinter in the ground beneath where their host plant grew.
The four groups to rotate through your beds each season:
- Brassicas (cabbage, kale, broccoli, cauliflower, rocket, radish) — follow with legumes
- Legumes (beans, peas) — nitrogen-fixers; follow with hungry crops like brassicas or alliums
- Alliums (onion, leek, garlic, shallot) — follow with roots
- Roots & Solanum (carrot, beetroot, parsnip, potato, tomato, pepper, aubergine) — follow with brassicas
A four-bed layout cycling through these groups in order is the simplest, most effective rotation system for a home garden. Plan it from the start — retrofitting rotation into an established garden that was never designed for it is genuinely difficult.
EdenVatika tracks crop rotation warnings automatically
When you add a plant to a bed, the app checks whether that plant family grew in that bed in previous seasons and flags conflicts before you commit to a layout.
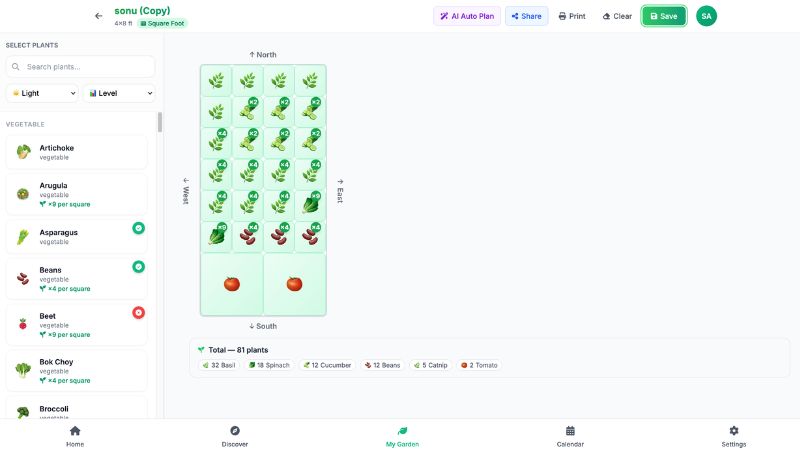
Start Planning Free →How to Build and Save Your Layout in EdenVatika
EdenVatika's garden bed designer is a drag-and-drop grid planner connected to real plant data. When you place a tomato it claims the correct number of squares at mature spacing.
When you add fennel next to basil it flags the incompatibility. When you add a brassica to last year's brassica bed it warns you before you commit.
The workflow for planning a new season:
- Create your beds — set exact dimensions matching your physical beds
- Add plants — the grid shows spacing at maturity, not transplant size
- Check companions and conflicts — incompatibilities and rotation violations flagged as you place each plant
- Save and refer back — layout saved to your account; update it as the season changes
- Share or copy — Pro users generate a public share link for any bed; any logged-in user can copy a shared bed directly to their own account
Free accounts include up to 2 beds. Pro accounts include unlimited beds, share links, PDF export, AI planting suggestions, and 7-day weather integration for your location.
Ready to plan your beds properly?
Create your free account, copy any of the plans above, and customise them for your space — no spreadsheet, no graph paper, no guesswork.
Create Free Account →